I finally finished my form1 can
I finally finished my form1 can
Well after a year of procrastinating, I finally made my first form 1 can. Here are some pics
Last edited by vettebob on Mon Apr 20, 2015 9:27 pm, edited 1 time in total.
Re: I finally finished my form1 can
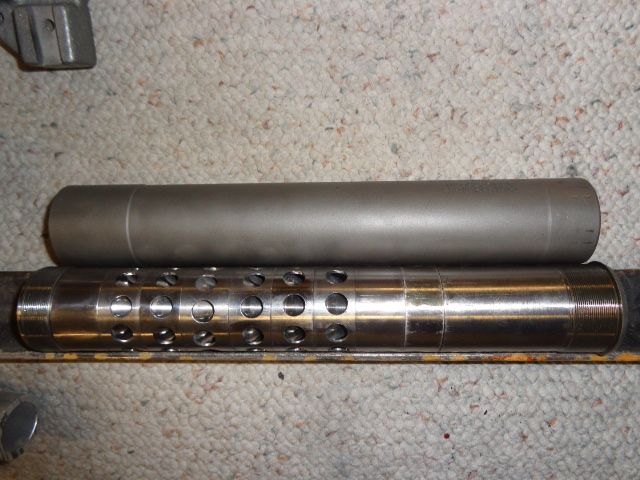
I made the tube 10" long 1.625 dia ends threaded 32 tpi out of grade 9m Titianium. 60 degree cones 6al4v ti 5each .625 long 3 notches clipped 120 degrees apart and 3each .725 long cones unclipped. Finished weight 19.8 ounces
Last edited by vettebob on Sat Apr 18, 2015 11:23 pm, edited 1 time in total.
-
a_canadian
- Silent But Deadly
- Posts: 1204
- Joined: Fri Oct 11, 2013 3:09 pm
Re: I finally finished my form1 can
You can upload your images to a photo sharing service sich as Photobucket or Picasa, then use the 'share link' option there to get the link to embed the photo here. This forum is not set up to host pictures directly.
-
a_canadian
- Silent But Deadly
- Posts: 1204
- Joined: Fri Oct 11, 2013 3:09 pm
Re: I finally finished my form1 can
Nice neat work amd what seem to be some intelligent choices for both accuracy and efficient suppression. Which calibre and which host? Will this be used for primarily sub- or super-sonic fire? Any chance of a test video?
Re: I finally finished my form1 can
It's 30 cal cones have a .360 center hole .070 wall thickness. I'm going to go the Sierra Factory outlet his week and get some bullets to load both supersonic and subsonic rounds. (they sell by the pound and usually throw in a few exra) My friend has a saker 7.62 I will compare it to. It will be going on a 10.5" 300 blackout and possibly a 308 later. It will be used primarily with subsonic ammo. I'll try to video it in the next week or 2. I should have the lower done today then I'll pin it to the barrel and post a couple of pics. Bob
-
armalite_ar50
- Silent Operator
- Posts: 56
- Joined: Mon Oct 04, 2010 3:06 pm
Re: I finally finished my form1 can
Cool.
to post pix put " after link" minus the quotes and link goes where the BEFORE+LINK+ is.
like this.
or off to the side in photobucket click and copy the "IMG" box then paste as plain txt.
Rich
to post pix put "
like this.

or off to the side in photobucket click and copy the "IMG" box then paste as plain txt.
Rich
Re: I finally finished my form1 can
Nice work, looking forward to your range results!
Re: I finally finished my form1 can
 endcap front
 endcap back
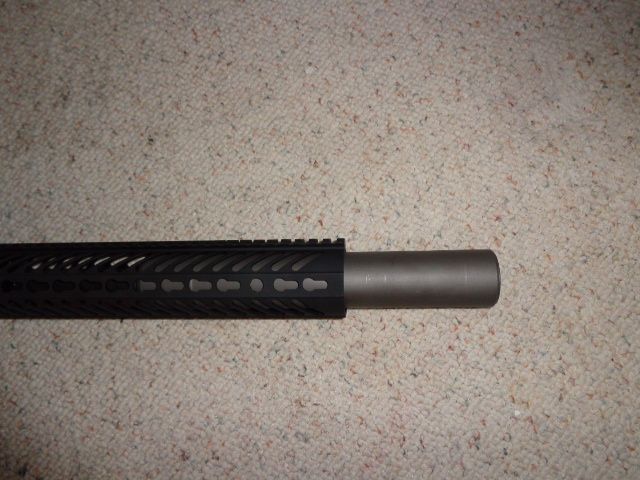
muzzle end

another pic

baffles

Thanks for showing how to post pics Bob
Re: I finally finished my form1 can
I have a quick question about machining come baffles with integral spacers. Is there any positive or negatives to making the spacer before or after the baffle? In my limited lathe skills, it seems easier to machine the spacer after the baffle vs the 'M' style where it is before and surrounds the cone. A quick thought is that it uses almost double the material in the first design. Am I missing anything else? Sorry, I'm just a dumb plumber, not a machinist!
Re: I finally finished my form1 can
I started to do cones and spacers then decided the m style was just as easy if not easier and uses less raw material. The key is to set your compound to 30 degrees then make a boring bar with a 30 degree angle. Use the saddle for depth and the compound for the cone. Machine one side then flip over and use the compound to machine the cone.
-
Gone2ddogs
- New Member
- Posts: 5
- Joined: Thu Mar 08, 2012 3:41 pm
Re: I finally finished my form1 can
Could you post a picture of the boring bar you made up for this?
Thanks
J
Thanks
J
Re: I finally finished my form1 can
Here's a pic of the boring bar 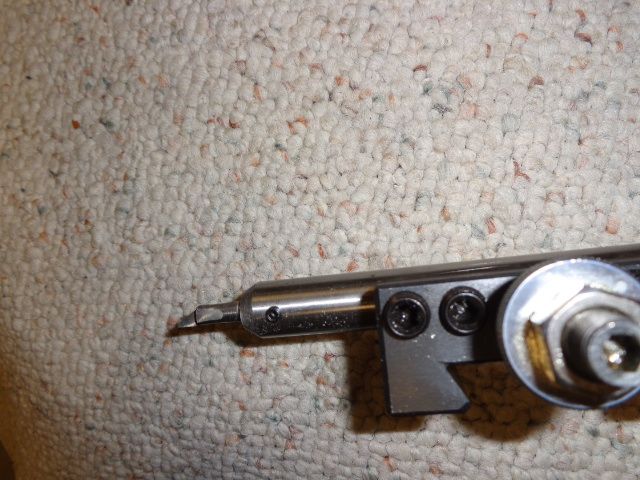
another pic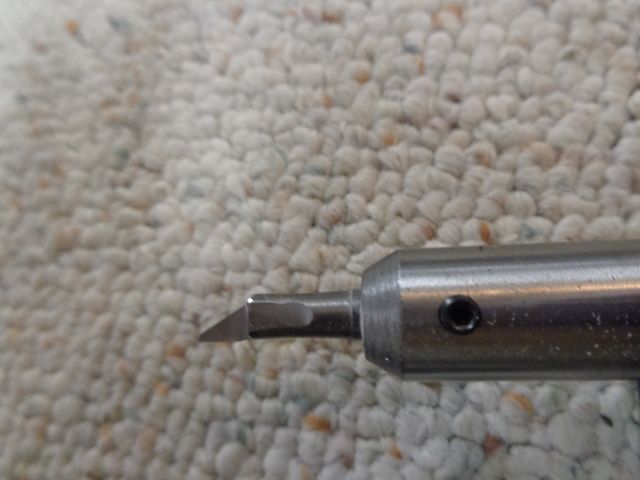
It's just a piece of split 1/4 carbide (available on ebay cheap) with a 30 degree taper ground on it. Bob

another pic

It's just a piece of split 1/4 carbide (available on ebay cheap) with a 30 degree taper ground on it. Bob
Re: I finally finished my form1 can
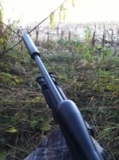
Here's a pic of the finished rifle 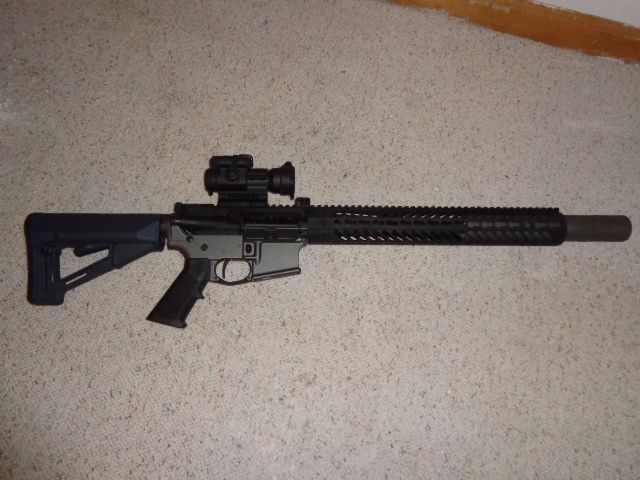


Re: I finally finished my form1 can
+2!vettebob wrote:Here's a pic of the boring bar
another pic
It's just a piece of split 1/4 carbide (available on ebay cheap) with a 30 degree taper ground on it. Bob
Excellent execution.
I had not seen this cleverly ground shape before for a boring bar.
Thank you for showing. It will be added to the glacially learned and gathered
storehouse of useful machining techniques.
Best.
Re: I finally finished my form1 can
I'm a novice machinist. How did you cut titanium with the pictured tool? I've been trying to make 60* cones out of 316SS and it takes FOREVER.
Re: I finally finished my form1 can
Are you using carbide or HSS? Also, what sort of machine are you using?V8Astro wrote:I'm a novice machinist. How did you cut titanium with the pictured tool? I've been trying to make 60* cones out of 316SS and it takes FOREVER.
Stainless turns beautifully with carbide (I use TCMT's), and I turn dry. Eventually I'll setup/install my coolant system but I haven't had a need to do so yet.
Don't putz around with it though; get that tool in there and take material off. Don't overlook speeds either as if the material gets hot, you'll have a problem on your hands.
Re: I finally finished my form1 can
Ok here's an explanation on how to turn the M shape. Say you want a 1.500 OD, .050 outer wall, .075 cone thickness, bore of .350 (these numbers are not what I used they are just an example). 1.500/2 - .050 = .700 radius This will be your inside finished outer wall. .075 + (.350/2) = .250 this will be your finished distance from center. Face your part (If you need to visualize blue up the end scribe a circle .700 from center and another .250 from center.) Ok now to the machining this will take about 15 min per cone or less depending on your lathe. Set your compound to 30 degrees from parallel to the part ( match the cutters angle). Square the tool holder to the part. Set the outside edge of the of the boring bar just inside the scribed outer circle. Take a cut say .030 deep then advance the cross slide until just inside the inner scribed circle. Repeat process being careful not to cut the inside cone you just started forming. When You have deep enough that you can no longer move the cross slide back and forth without touching the machined outer wall you are at your finished depth. Now position the boring bar to the final outer radius and bore to final depth to clean up the outer wall. Then position the boring bar .250 from center on the far side (away from the operator) reverse the lathe direction and bore your finished inside cone to final diameter using the compound you previously set to 30 degrees.
I answered the boring bar question in a previous post. I machined mine on my Monarch 10EE toolroom lathe dry no coolant 400rpm .002 feed ( Lathe shouldn't matter as long as you can reverse the spindle). Bob
I answered the boring bar question in a previous post. I machined mine on my Monarch 10EE toolroom lathe dry no coolant 400rpm .002 feed ( Lathe shouldn't matter as long as you can reverse the spindle). Bob
Re: I finally finished my form1 can
looks tight!
Re: I finally finished my form1 can
Thanks I shot it Yesterday. You can hear the bolt and spring moving. I was sighting it in under a metal roof and did not need hearing protection. Will try to put a DB meter to it this week. It is nice only problem I ran into is it is severely over gassed. I will be changing out the buffer and spring for a heavier one. I will load up some more ammo and do a proper test as soon as I get a chance. Casting up a bunch of 200gr boolits (I modified a 230 gr Lee mould). Bob
-
Shift1
- Silent But Deadly
- Posts: 556
- Joined: Mon Feb 22, 2010 8:12 pm
- Location: Lurking in the shadows of the Rocky Mountains
Re: I finally finished my form1 can
Guessing in 300BLK? 5744 or 1680 would be a good choice of powder, I am using 208 A-Max with good result. Have had good luck using Hornaday 220 rn in sub .308. Do you have any concerns with leading up like .22 lr.
"The Constitution shall never be construed to prevent the people of the United States who are peaceable citizens from keeping their own arms."- Samuel Adams
"LP"
"LP"